发布时间:2014-5-12 20:14
分类名称:Driver
Installing a Plug and Play device

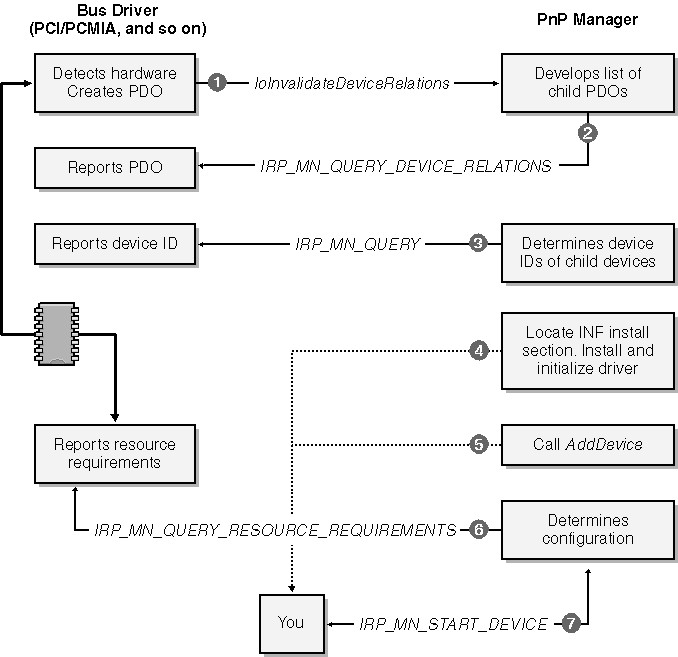
When a bus driver detects the insertion or removal of hardware, it calls IoInvalidateDeviceRelations to notify the PnP Manager that the bus's population of child devices has changed. To obtain an updated list of the PDOs for the child devices, the PnP Manager sends an IRP to the bus driver. The major function code for this IRP is IRP_MJ_PNP, and the minor function code is IRP_MN_QUERY_DEVICE_RELATIONS, with a code indicating that the PnP Manager is looking for the so-called "bus" relations.
In response to the bus relations query, the bus driver returns its list of PDOs. The PnP Manager can easily determine which of the PDOs represent devices that it hasn't yet initialized. Let's focus on the PDO for your hardware for the time being and see what happens next.
The PnP Manager will send another IRP to the bus driver, this time with the minor function code IRP_MN_QUERY_ID. This is point 3 in Figure. In fact, the PnP Manager sends several such IRPs, each with an operand that instructs the bus driver to return a particular type of identifier. One of the identifiers, the device identifier, uniquely specifies the type of device. A device identifier is just a string, and it might look like one of these examples:
PCI\VEN_102C&DEV_00E0&SUBSYS_00000000
USB\VID_0547&PID_2125&REV_0002
PCMCIA\MEGAHERTZ-CC10BT/2-BF05
The PnP Manager uses the device identifier to locate a hardware key in the system registry.
If this is the first time your particular device has been plugged into the computer:
If this is not the first time your particular device has been plugged into the computer:
Then:
PnP Manager calls the Memory Manager to map driver in.
Call DriverEntry.
Call AddDevice
Then the PnP Manager sends an IRP to the bus driver with the minor function code IRP_MN_QUERY_RESOURCE_REQUIREMENTS. This IRP is basically asking the bus driver to describe the requirements your device has for an interrupt request line, for I/O port addresses, for I/O memory addresses, and for system DMA channels. The bus driver constructs a list of these resource requirements and reports them back.
Finally the PnP Manager is ready to configure the hardware. It works with a set of resource arbitrators to assign resources to your device. If that can be done—and it usually can be—the PnP Manager sends an IRP_MJ_PNP to your driver with the minor function code IRP_MN_START_DEVICE. Your driver handles this IRP by configuring and connecting various kernel resources, following which your hardware is ready to use.
Legacy Devices
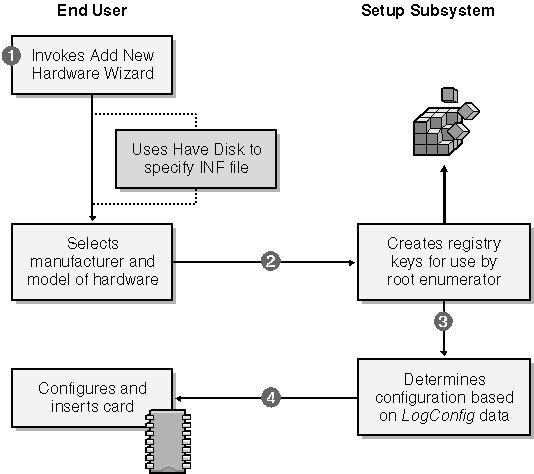
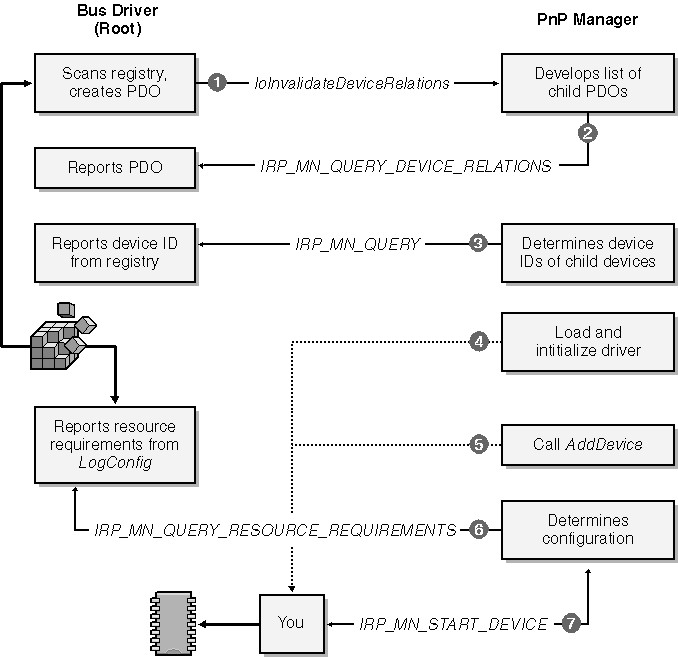
Finally the setup program instructs the end user to restart the system. Following the restart (or following the end user's decision to bypass the restart), the root enumerator will scan the registry and find the newly added device. Thereafter, the process of loading your driver is nearly identical to that for a Plug and Play device.
Order of Driver Loading
The order of calls to the AddDevice functions in the various drivers.
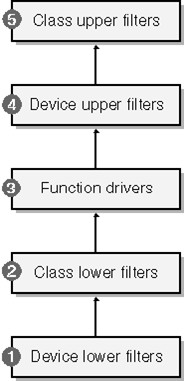
As I explain later in this chapter, each AddDevice function creates a kernel DEVICE_OBJECT and links it into the stack rooted in the PDO. Therefore, the order of calls to AddDevice governs the order of device objects in the stack and, ultimately, the order in which drivers see IRPs.
Situation 1
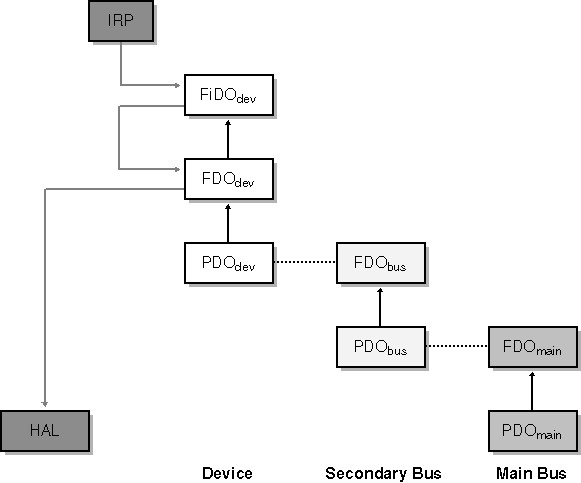
Such a request would flow first to the upper FiDO and then to the function driver for the device. (That driver is the one for the device object marked FDOdev in the figure.) The function driver calls the HAL directly to perform its work, so none of the other drivers in the figure will see the IRP.
The flow of a read request for a device on a secondary bus
Situation 2
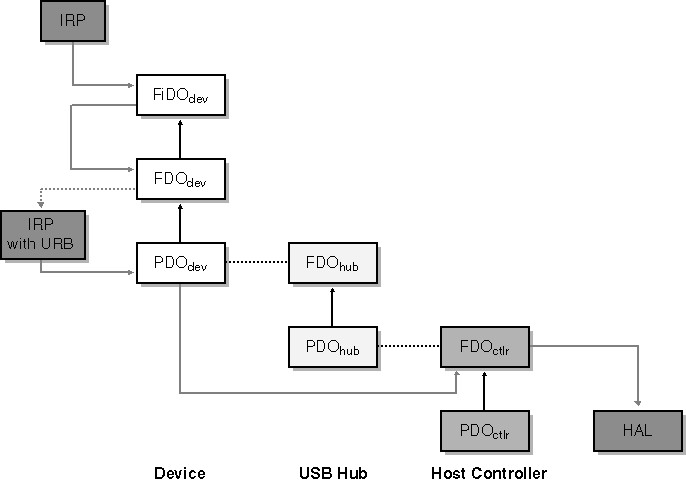
Here we have a read request for a device plugged into a USB hub that itself is plugged into the host controller. The complete device tree therefore contains stacks for the device, for the hub, and for the host controller. The IRP_MJ_READ flows through the FiDO to the function driver, which then sends one or more IRPs of a different kind downward to its own PDO. The PDO driver for a USB device is USBHUB.SYS, and it forwards the IRPs to the topmost driver in the host controller device stack, skipping the two-driver stack for the USB hub in the middle of the figure.
The flow of a read request for a USB device.
Situation 3
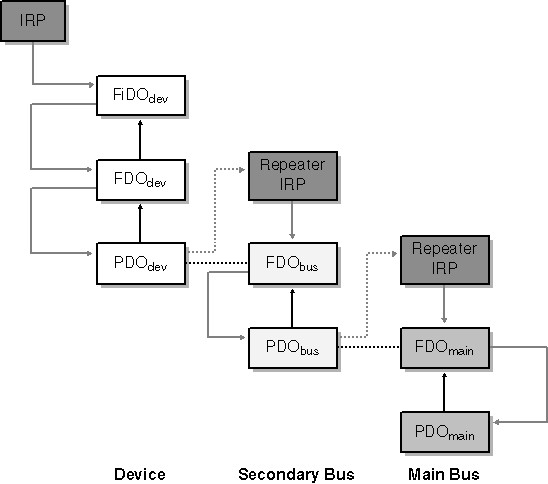
The third example is similar to the first except that the IRP in question is a notification concerning whether a disk drive on a PCI bus will be used as the repository for a system paging file. You'll learn in Chapter 6 that this notification takes the form of an IRP_MJ_PNP request with the minor function code IRP_MN_DEVICE_USAGE_NOTIFICATION. In this case, the FiDO driver passes the request to the FDOdev driver, which takes note of it and passes it further down the stack to the PDOdev driver. This particular notification has implications about how other I/O requests that concern the PnP system or power management will be handled, so the PDOdev driver sends an identical notification to the stack within which is the FDObus, as illustrated in Figure 2-10. (Not all bus drivers work this way, but the PCI bus does.)
The Role of the Registry
The PnP Manager and setup subsystems rely heavily on four keys in the HKEY_LOCAL_MACHINE branch of the registry. These are called the hardware key, the class key, the driver key, and the service key. (See Figure) To be clear, these are not the proper names of specific subkeys: they are generic names of four keys whose pathnames depend on the device to which they belong. Broadly speaking, the hardware and driver keys contain information about a single device, the class key concerns all devices of the same type, and the service key contains information about the driver. People sometimes use the name instance key to refer to the hardware key and software key to refer to the driver key. The multiplicity of names derives from the fact that Windows 95/98/Me and Windows XP were written (mostly) by different people. A fifth key, the hardware parameters key, might also exist; it contains nonstandard parameter information about the device.
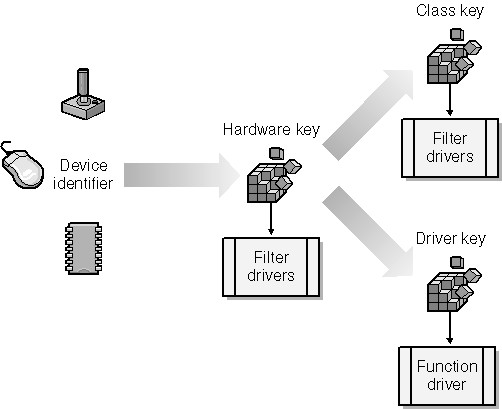
You should plan to use those APIs instead of directly tampering with the registry. In fact, even administrator accounts lack permission to write to some of these keys.
The Hardware (Instance) Key
Device hardware keys appear in the \System\CurrentControlSet\Enum subkey of the local machine branch of the registry.
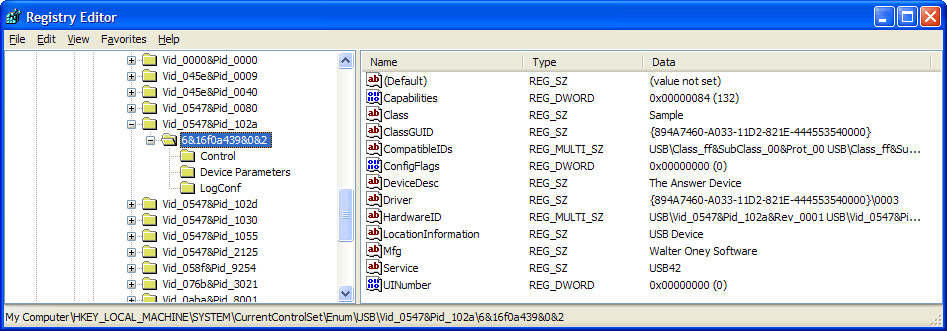
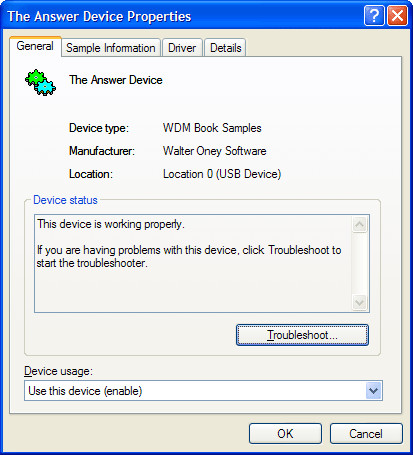
Some of the values in the hardware key provide descriptive information that user-mode components such as the Device Manager can use. Figure 15-3 shows how the Device Manager portrays the properties of USB42. If you compare the two figures, you'll notice some common things. In particular, the DeviceDesc string in the hardware key is the title of the device (unless there happens to be a FriendlyName property in the registry, which isn't the case here), and the Mfg property appears as the Manufacturer name in the property page.
The hardware key also contains several values that identify the class of device to which the device belongs and the drivers for the device. ClassGUID is the ASCII representation of a globally unique identifier (GUID) that uniquely identifies a device setup class; in effect, it's a pointer to the class key for this device. Class is the name of the setup class. Driver names the driver key, which is a subkey of the class key. Service is a pointer to the service key in HKLM\System\CurrentControlSet\Services. Optional values (which USB42 doesn't have) named LowerFilters and UpperFilters, if present, would identify the service names for any lower or upper filter drivers.
A hardware key might have overriding values named Security, Exclusive, DeviceType, and DeviceCharacteristics that force the device object the driver will create to have certain attributes. USB42 doesn't have these overrides.
Finally, the hardware key might contain a subkey named Device Parameters, which contains nonstandard configuration information about the hardware. See Figure . SampleInfo, the only property in the figure for USB42, specifies the help file for the sample driver. (The other values in the figure are artifacts of a failed run of one of the Hardware Compatibility Tests. Their presence does no harm.)

The Class Key
The class keys for all classes of device appear in the HKLM\System\CurrentControlSet\Control\Class key.
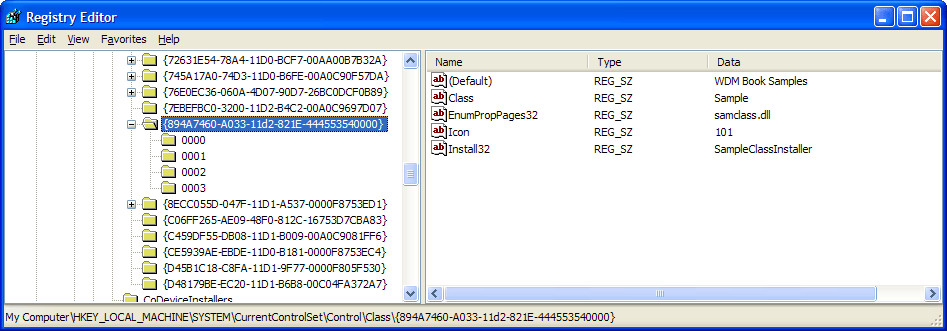
The SAMPLE class lacks some of the optional values that might be present, such as the following:
There can be a Properties subkey of the class key, which can contain values named Security, Exclusive, DeviceType, and DeviceCharacteristics. These values override default settings of certain device object parameters for all devices of this class
The Driver Key
Each device also has its own subkey below the class key. The name of this key (actually, the name of this key relative to CurrentControlSet\Control\Class) is the Driver value in the device's hardware key. Refer to Figure for an illustration of the contents of this subkey, the purpose of which is to correlate all these registry entries with the INF file used to install the device and to provide a repository for driver-specific configuration information that concerns this device.

Both the driver key and the hardware parameters key can contain parameter information about a device. The difference between the two keys is a bit subtle. The DDK says that the driver key contains "driver-specific information," whereas the hardware parameters key contains "device-specific information." In both cases, the "information" in question pertains to a particular instance of the device. Microsoft's concept is that the driver-specific information would be peculiar to a given driver and not relevant to some other driver for the same hardware. I confess that this distinction pretty much escapes me, inasmuch as I'm used to thinking that any given device will have just one driver.
The Service (Software) Key (这里和MSDN有出入,MSDN中将Software Key 和 Driver Key等价。所以以MSDN为主。)
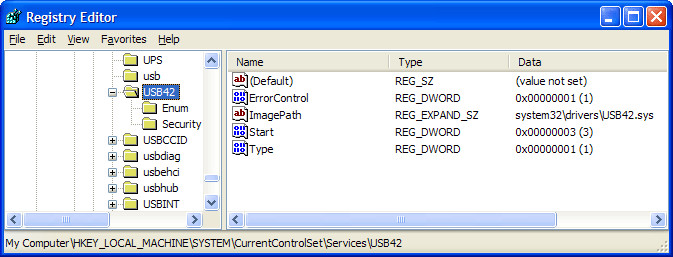
The last key that's important for a device driver is the service key. It indicates where the driver's executable file is on disk and contains some other parameters that govern the way the driver is loaded. Service keys appear in the HKLM\System\CurrentControlSet\Services key.
Accessing the Registry from a Program
Accessing the Registry from a Driver (kernel mode)
Registry Key | Function to Use for Access |
Hardware | Read individual standard properties via IoGetDeviceProperty. You can't change these properties from a driver, and you shouldn't try to figure out the name of this key in order to open it directly. |
Hardware Parameters | IoOpenDeviceRegistryKey (PLUGPLAY_REGKEY_DEVICE option) |
Driver | IoOpenDeviceRegistryKey (PLUGPLAY_REGKEY_DRIVER option) |
Class | No access method provided, and you shouldn't try to figure out the name of this key in order to open it directly. |
Service | ZwOpenKey using RegistryPath parameter to DriverEntry. |
Example:
WCHAR name[256];
ULONG junk;
status = IoGetDeviceProperty(pdo,
DevicePropertyDeviceDescription, sizeof(name), name, &junk);
KdPrint((DRIVERNAME
" - AddDevice has succeeded for '%ws' device\n", name));
Accessing the Registry from User Mode
Registry Key | Function to Use for Access |
Hardware | Read or write individual standard properties via SetupDiGetDeviceRegistryProperty and SetupDiSetDeviceRegistryProperty. |
Hardware Parameters | SetupDiOpenDevRegKey (DIREG_DEV option). |
Driver | SetupDiOpenDevRegKey (DIREG_DRV option). |
Class | SetupDiOpenClassRegKey. Starting in Windows XP, read or write device object properties via SetupDiGetClassRegistryProperty and SetupDiSetClassRegistryProperty. |
Service | QueryServiceConfig, ChangeServiceConfig. |
Example:
[retrieve the friendly name]
HDEVINFO info = SetupDiGetClassDevs(...);
SP_DEVINFO_DATA did = {sizeof(SP_DEVINFO_DATA)};
SetupDiGetDeviceInterfaceDetail(info, ..., &did);
TCHAR fname[256];
SetupDiGetDeviceRegistryProperty(info, &did,
SPDRP_FRIENDLYNAME, NULL, (PBYTE) fname,
sizeof(fname), NULL);
[retrieve the various properties]
LPCTSTR devname; // <== someone gives you this
HDEVINFO info = SetupDiCreateDeviceInfoList(NULL, NULL);
SP_DEVICE_INTERFACE_DATA ifdata = {sizeof(SP_DEVICE_INTERFACE_DATA)};
SetupDiOpenDeviceInterface(info, devname, 0, &ifdata);
SP_DEVINFO_DATA did = {sizeof(SP_DEVINFO_DATA)};
SetupDiGetDeviceInterfaceDetail(info, &ifdata, NULL, 0, NULL, &did);
Device Object Properties
As you know, you call IoCreateDevice to create a device object. In a WDM driver, your AddDevice function ordinarily creates a single device object and links it into the PnP driver stack by calling IoAttachDeviceToDeviceStack. Once the function driver and all filter drivers have finished these steps, the PnP Manager consults the registry to apply optional overrides to some of the settings in the device objects. The settings in question are these few:
The PnP Manager looks first in the hardware key and then in the Properties subkey of the class key to find these overrides. After modifying the PDO, the PnP Manager then merges the characteristics flags from all device objects in the stack and sets certain ones (selected by the FILE_CHARACTERISTICS_PROPAGATED mask in ntddk.h) to be the same in all the device objects. At the present time, the characteristics flags that are propagated are these:
For the security and exclusivity overrides to be effective, none of the filter or function drivers in the PnP stack should name their device objects. They should instead use IoRegisterDeviceInterface as the only method of establishing a symbolic link. The registered interface approach forces the I/O and Object Managers to refer to the PDO when opening a handle to the device, thereby giving effect to these two overrides.
The overriding values come to exist in the registry in one of two ways. You can specify them with special syntax in your INF file. Alternatively, you or some standard management application can use the SetupDiSetXxxRegistryProperty functions to change them in the hardware or class keys.